
Button’s
This follows on from the LED’s example.
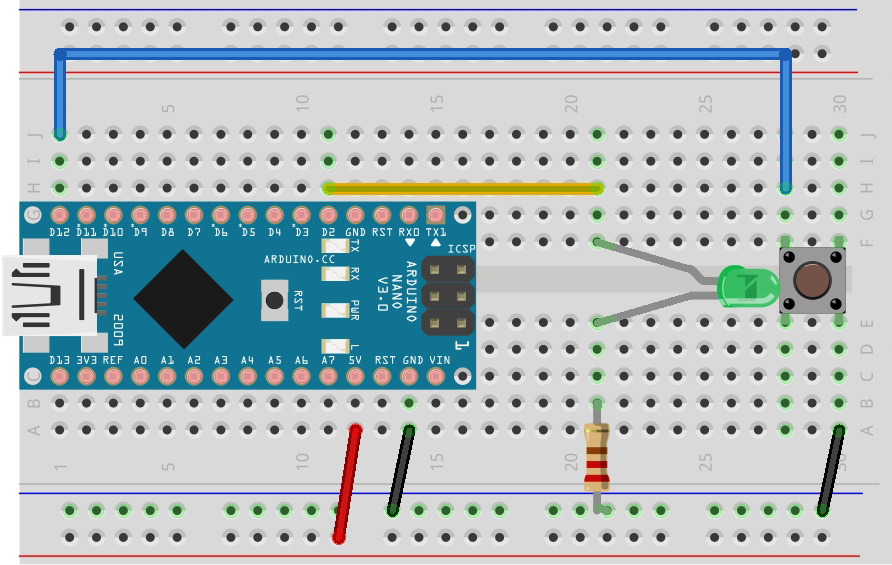
To build this circuit, attach a wire from the 5v Arduino Nano pin to the bottom power rail. Place the button across the trench in the middle of the breadboard. Connect a wire from one side to the ground rail and another wire from the opposite side of the button to pin 12.
Pushbuttons or switches connect two points in a circuit when you press them. When the pushbutton is open (unpressed) there is no connection between the two legs of the pushbutton, so the pin is connected to power (through the internal pull-up resistor) and reads as HIGH, or 1. When the button is closed (pressed), it makes a connection between its two legs, connecting the pin to ground, so that the pin reads as LOW, or 0.
CODE:
Just like the LED example we name and initialise digital pin 12, the pin that will read the output from your button, as an input:
const byte btnPin = 12;

pinMode(btnPin,INPUT);

digitalWrite(btnPin, HIGH);
That last command telling the btnPin input to write HIGH, turns on the internal pull-up resistor.
If you don’t have a pull-up resistor the digitalRead may behave erratically. This is because the input is “floating” – that is, it doesn’t have a solid connection to voltage or ground, and it will randomly return either HIGH or LOW. That’s why you need a pull-up or pull-down resistor in a circuit.
Now that your setup has been completed, we move into the main loop of your code. When your button is not pressed, the input pin will be connected to 5 volts through the internal pull-up resistor. When it is pressed the voltage will drop to 0v as it will be connected to ground. This is a digital input, meaning that the switch can only be in either an on state (seen by your Arduino as a “1”, or HIGH) or an off state (seen by your Arduino as a “0”, or LOW), with nothing in between. You get the pin state with the following command:
digitalRead(btnPin);
Once the Arduino has read the input we let the code make a decision using an if statement. It allows you to make something happen or not depending on whether a given condition is true or not. It looks like this:
if(someCondition == expectedValue){

// run this code if Condition is true

}
Notice the double equals “==”, We use these when comparing 2 values and only 1 when assiging a variable a value
There is a common variation called if-else. It is what we are using and that looks like this:
if(someCondition == expectedValue){

// run this code if Condition is true

} else {

// run this code if Condition is false

}
So our code reads the button state then decides what to do depending on that state. In our case it changes the delayTime variable and blinks the LED fast or slow.
delay(time_in_millisseconds);
This line tells the Arduino to do nothing for a length of time. You pass it the amount of time in milliseconds. So delay(1000) stops it for 1 second.
It sometimes helps if you think about what you want your program to do before starting to code. In the case of the above program, if we had thought about it, it would probably of looked something like this:
Was the button pressed?

Yes: Blink Fast

No: Blink Slow
This is called pseudo code. Although the computer won’t understand it, people will and you will find that after clearly defining what you want your program to do, converting it to code will become easier.